Player areas · Dealer areas · Center bets · Chip movement
A traditional craps layout has two nearly identical end sections and one shared center section. Learn which bets you place yourself, which bets the dealer controls, and where chips move after a number is established; the table becomes far less intimidating.
Fast orientation: use the end section directly in front of you, watch the ON/OFF puck, and keep your hands out of the six numbered dealer boxes and the shared center proposition area.
Follow the chips
Where your wager starts
The three layout zones
| Zone | Who uses it | Main wagers |
|---|---|---|
| Your end section | Players and the base dealer on that half | Pass, Don’t Pass, Come, Don’t Come, Field, Place, Buy, Lay |
| Opposite end section | Players and base dealer at the other end | A duplicate of the same common wager areas |
| Shared center | Both ends; handled by stickperson/crew | Hardways, Horn, Any 7, Any Craps, hop and other proposition bets |
The duplicate ends are not separate games. One dice result settles wagers across the entire table. You normally care only about the end in front of you and the shared center.
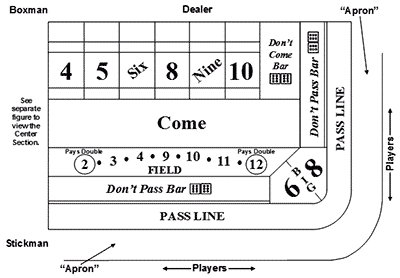

Self-service versus dealer-controlled wagers
| Wager action | Who normally places or moves the chips |
|---|---|
| Start Pass Line, Don’t Pass, Come, Don’t Come, or Field | Player |
| Add Pass/Don’t Pass Odds | Player places chips behind the flat wager |
| Book Place, Buy, or Lay wager | Dealer after the player calls the bet |
| Move a Come/Don’t Come wager to a number | Dealer |
| Add Odds to a traveled Come/Don’t Come wager | Dealer after the player provides chips and instruction |
| Book a center proposition wager | Stickperson or dealer according to table procedure |
The blank felt between the printed layout and the inside wall is commonly called the apron. Dealers may use it to return chips, receive a wager instruction, or separate money that is not yet booked. Chips sitting in the apron are not automatically a bet; communicate clearly.
Pass Line
The Pass Line runs around the outer edge of each end. Place the wager yourself before the come-out roll. It wins immediately on 7 or 11, loses on 2, 3, or 12, and otherwise follows an established point. After a point, the bet wins if that number repeats before 7.
A flat Pass wager is normally a contract bet after the point and cannot be removed. Optional Odds chips sit in the blank area directly behind it. See the complete Pass Line guide.
Don’t Pass bar
The Don’t Pass area is commonly labeled DON’T PASS BAR 12. Under that rule, a come-out 2 or 3 wins, 7 or 11 loses, and 12 pushes. If a point is established, the bet wins when 7 appears before the point. Some layouts bar 2 instead, so read the printing.
Don’t Pass may generally be removed after a point, but doing so surrenders the favorable part of the bet: 7 has more combinations than every point number. Table culture sometimes favors Pass players, but Don’t Pass is a normal authorized wager and should not be treated as misconduct.
Come and Don’t Come
Players start Come and Don’t Come bets in the large printed boxes. The next roll acts like a personal come-out for that wager. If 4, 5, 6, 8, 9, or 10 becomes its number, the dealer moves the chips to the corresponding numbered box.
Once the bet travels, do not reach into the numbered area. The dealer positions it so ownership and wager type remain readable. To add Odds, place the chips in the apron, identify the wager, and let the dealer stack them correctly.
The six numbered point boxes
The dealer area displays 4, 5, SIX, EIGHT, NINE, and 10. Six and nine are often spelled out to prevent confusion across the table. The large boxes and adjacent strips organize several wager types at the same time.
| Chip position | Common meaning |
|---|---|
| Inside numbered box | Come or Buy wager, distinguished by position/marker |
| Narrow strip associated with number | Place wager |
| Area behind/above number | Don’t Come or Lay wager, distinguished by position/marker |
| ON puck centered on number | Current Pass Line point |
Exact chip geometry varies with the layout and crew convention. Players should call the wager and let the dealer use the house’s position. Small BUY, LAY, ON, or OFF markers resolve ambiguity.
The ON/OFF puck
Black OFF means no Pass Line point exists and the next roll begins a new cycle. When 4, 5, 6, 8, 9, or 10 establishes a point, the dealer turns the puck to white ON and places it on that number. After the point repeats or 7 appears, the puck returns to OFF.
The puck tracks the table’s main point, not every Come bet. Traveled Come/Don’t Come wagers can have their own numbers while the puck remains elsewhere.
When the puck resets but a Come bet remains
Imagine the puck is ON at 8 and you put $10 in Come. The next roll is 5, so the dealer moves that Come wager to the 5 box; it now has its own number. If the shooter rolls 8 next, the Pass Line point is made and the puck goes OFF. The traveled Come 5 is still on the layout because neither 5 nor 7 has decided it.
On the following come-out roll, a 5 wins that Come bet and a 7 loses it, even though a new Pass Line wager would win on a come-out 7. The puck describes the table’s Pass point, while the dealer’s chip position tracks the separate Come number. Ask the dealer about the working status of any Odds behind the Come bet; house procedures for Odds on the come-out can vary.
Field area
The Field is a one-roll self-service wager. It wins on 2, 3, 4, 9, 10, 11, or 12 and loses on 5, 6, 7, or 8. Ordinary winning totals pay even money; 2 and 12 can pay double or triple according to the printed layout. That variation materially changes the house edge.
Big 6 and Big 8
Some layouts print large Big 6 and Big 8 boxes in the player area. Each wins if its number appears before 7 and traditionally pays even money, producing a 9.09% house edge. A dealer-placed Place 6 or Place 8 normally pays 7 to 6 with a 1.52% edge, so it is usually the better version of the same number-before-7 proposition.
Center proposition section
The center contains hardways, Any 7, Any Craps, Horn numbers, C&E, hop bets, and layout-specific propositions. Both ends share it. These wagers are normally called to the stickperson or passed through the base dealer; follow that table’s chip-delivery procedure rather than throwing a chip without acknowledgment.
If a proposition wins, the stickperson commonly announces the amount and the base dealer delivers the payment to the apron in front of the player. Many center bets carry house edges above 9%, so visual prominence is not a value recommendation.
First-time layout walkthrough
- Find the placard and read the minimum, maximum, and Odds rule.
- Locate the Pass Line directly in front of your position.
- Check whether the puck is OFF or marking a point.
- Identify your base dealer’s six numbered boxes.
- Notice the shared center, then ignore it until you understand its payouts.
- Keep hands clear after the stickperson sends dice to the shooter.
Use the complete craps-bets hub to match each printed area with rules, payout, house edge, and a detailed guide.
Rules source
Beginner path · Lesson 2 of 8: Find your way around the layout
Check your understanding
Who should place or move your Place 6 chips in the number box?
Show the answer and explanation
The dealer. State the number and amount clearly, supply chips where the crew directs, and keep your hands out of the dealer-controlled boxes.
Explain the answer in your own words before continuing. Reading this topic does not require you to use the wager or visit a casino.